
How Can 4 Simple Stretches Improve Hip Mobility?
Hips. Butts. Booties. That is crazy. It’s no secret that the glutes have taken center stage in pop culture lately; these days, it’s all about the butt. As someone who grew up in the 1990s when skinny was fashionable and a big butt was definitely NOT what you wanted, I find it SO odd that the bigger, the better.
However, at the moment, having a large caboose is “in,” and everyone—including boys—is making every effort to bulk up their posteriors.
Naturally, if you’re an athlete, you’re aware that having a strong, larger rear-end has benefits that have nothing to do with physical attractiveness. In sports where power and quickness are needed, having strong glutes is essential.
And you know what else is important to being successful in sports and avoiding pain and dysfunction? Making sure those big booty muscles remain flexible and functional.
There are a ton of Instagram videos and images that show you how to get a bigger, stronger butt, but there are almost none that show you how to make sure your glutes aren’t overly tight and unbalanced. It won’t be long before a hip or glute injury sidelines you if you frequently squat, clean, bridge your glutes, and bootie band.
Now, there are countless hip mobility exercises, poses, and stretches that I could list. I’m going to describe my personal favorite stretches to increase your hip mobility instead of writing a novel about every hip and glute-loosening exercise there is (which you wouldn’t read).
- EFFECTIVE IN A QUICK AMOUNT OF TIME.
- ARE USER-FRIENDLY AND CAN BE ADJUSTED TO YOUR FLEXIBILITY OR LACK THEREOF, AND.
- BECAUSE I UNDERSTAND THAT NOT ALL OF US LOVE STRETCHING AND YOGA, IT CAN BE DONE WHILE VEGGING OUT WATCHING NETFLIX, TALKING TO YOUR FRIENDS AFTER YOUR WOD, OR WHILE SCROLLING ON INSTAGRAM.
All of the stretches that are listed after that should be performed AFTER the dynamic exercises have subsided. It’s a great idea to stretch out and improve your mobility after a workout or WOD, so congratulations if that’s the case. First of all, congratulations on beginning your stretching routine.
Next, take 5 to 10 minutes to warm up your muscles by doing some light jogging, walking, air squats, lunges, or whatever other body weight exercises you enjoy doing to increase blood flow to your extremities. Always, always increase hip mobility and stretching gradually. We want to make sure that your muscles, tendons, and ligaments are prepared to move through range.
Ligaments and tendons will slowly adjust and lengthen. Although it will take some time, you can make them loosen up. Consider the improvement in your mobility as a long-term investment. Be sure to compare this year to the next, not this week to the next.
As long as it feels natural to you and is appropriate for your current level of flexibility, try to hold each stretch for a longer period of time. Keep in mind that you cannot force this!
4 Stretches to Increase Hip Flexibility.
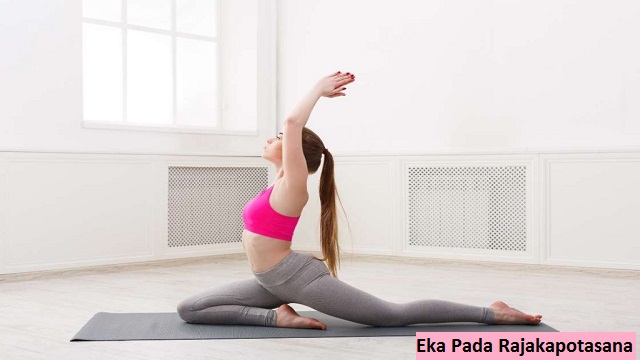
1. Eka Pada Rajakapotasana, also known as the Pigeon Pose.
My favorite hip stretch of all time, in actuality. Once your hips are loose enough to really sink into this position, it can actually be very relaxing and can be scaled to almost everyone’s needs. It also helps with low back pain.
For all the yoga enthusiasts in the house, this is indeed the one-legged pigeon pose, also known as Eka Pada Rajakapotasana (hey!). Stretching the psoas, piriformis, TFL (tensor fascia latae), and gluteus maximus in particular, this position aids in external rotation of the femur.
Yoga-style instructions for how to strike the pigon pose are as follows.
The right side will be stretched first.
- Begin by lying on your back.
- Bring the right knee into your chest after raising the right leg high.
- Right knee will fall out to the right side of your body if you place the right ankle exactly behind the left wrist.
- Straighten your left leg behind you and extend it. As much as possible, ensure that your hips are square. Don’t let one hip sit in front of or behind the other.
- Also, refrain from rolling onto one hip while leaning. Rolling on the side of the bent leg has a tendency to make the stretch much less effective while also making it much more comfortable.
- Use pillows, blankets, blocks, or anything else you have at your disposal to support your hips so you can sit in this position without experiencing pain if you discover that your hips don’t touch the ground on both sides and you have to hold yourself in place with your arms.
- The left hip flexor, psoas, and right outer hip/glute should all feel stretched.
- The right hip may feel more intensely stretched if you extend your arm forward and let your chest drop toward the floor.
- On the left hip, switch, then repeat.
Lying Pigeon has been modified.
- Try Reclined Pigeon if you find the standard version of the game to be too intense or if you simply want to try something new.
- With both knees bent, lie face up on the ground in supine position.
- Just above the knee, place your right ankle over your left thigh.
- Grab your left shin or hamstring with both hands while extending your right hand between your thighs and left hand around the outside of your left leg.
- Pull the shin or back of the thigh in toward your chest while keeping your low back in contact with the ground.
- The outside of your right hip and glute should feel stretched.
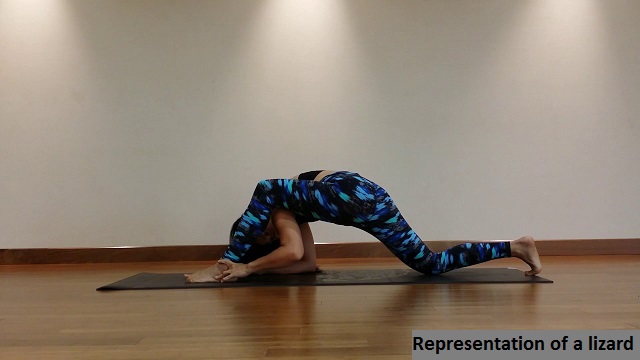
2. Yutthan Pristhasana’s representation of a lizard.
The hip flexor, groin, hamstrings, and hips are all helped to loosen up by this stretch, which may seem a little basic but is effective for increasing hip mobility. It’s a great one to begin with before progressing to more intense hip stretches.
How do you enter a lizard?
- Set up in the down dog position.
- Move the right foot outward toward the right hand.
- So that it is resting on the ground, lower your left knee. Make sure that your hips are squared and that your left leg is straightly extended behind you.
- You can lower your torso until your elbows and forearms are resting on the floor for a deeper stretch. Rolling onto the outside of the right foot and pushing the right knee out to the side will also give you a stronger stretch in the groin and adductors.
- Repeat on the other side after holding for however long feels comfortable.
LIZARD has undergone changes.
Put blocks, pillows, or blankets under your back knee or use them to support your arms and forearms. Never forget that flexibility cannot be forced.

3. Bound Angle, or Baddha Konasana.
Bound Angle works wonders to increase hip mobility and feels wonderful on the lower back. The groin muscles, including the adductors, are stretched. This is a simple and nearly instant “ahhhh” for my low-back whenever I have a few minutes before or after a workout, before yoga class begins, or even when I’m at home playing with my young son on the floor. I really hope you agree!
How to enter bounding angle.
This one is fairly simple.
- Legs extended in front of you, sit down on the floor.
- With the soles of your feet on the ground, bring both knees toward your chest.
- Bring the soles of your feet together and then allow your knees to sag to the side.
- If it’s comfortable, you can make the stretch more intense by folding forward at the waist or gently pulling your chest toward your feet while clasping your feet.
- To help you relax into the pose, you can use bolsters or pillows.
Bound Angle is modified.
Place blankets or pillows under your thighs to support them if your knees do not touch the ground (don’t feel bad; neither do mine), and the stretch in your groin and adductors feels too intense.
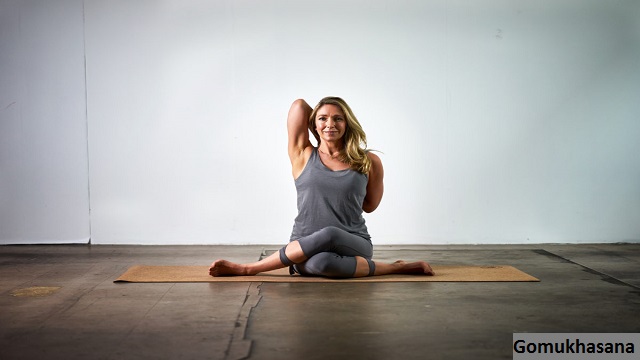
4. Gomukhasana, also known as cow face.
The seated version can be challenging if you’re not very flexible, so I’ve included a modification that’s great for the less flexible among us, tight days, or days when sitting upright just doesn’t feel good.
How to Enter the cow’s face.
- squat with your legs extended in front of you in a straight line.
- With the soles of your feet on the ground, bend both knees and bring them into your chest.
- Put your left foot on the outside of your right hip and slide your right knee underneath.
- Bring your right foot to the outside of your left hip and cross your right leg over your left, stacking the right knee atop the left.
- Sit as comfortably as possible with both hips on the floor. By bending forward, you can increase the stretch. Continue on the opposite side.
Cow face is modified.
Being in this pose can be very difficult. If you find it uncomfortable, try padding your hips Mobility with pillows and blankets. If you have trouble stacking your knees or making sure one leg is resting on top of the other, you can even slide a block, pillow, or blanket between your thighs.
Alternatively, you can lay flat with your knees bent and your feet flat on the ground. Cross the left thigh over the right. Bring the knees into the chest while reaching down and grabbing the ankles or shins. If you are unable to reach your shins or ankles, you can wrap a strap, belt, towel, or shirt around your legs and pull the towel toward your chest.
The Main Point:
These are the stretches that work the best for me to increase hip mobility, though there are certainly others. Strong but also healthy and mobile hips Mobility are essential for maximizing your athletic potential; believe me, if you are currently skipping mobility and “getting away with it”,The time it takes for it to catch up to you won’t be very long. Even a handstand will be challenging for you to perform if your hip and glute range is constrained.
Many movements, including squatting, lunging, and anything else that requires hip flexion (which is a LOT of movements), won’t be possible for you to perform in the best positions if your hips and glutes are tight. Guys, I almost guarantee that your low back pain is caused in part by restricted hip and glute mobility if you frequently complain about it.
Additionally, the risk of injury increases the longer you put off working on having more flexible muscles, ligaments, and tendons. People, everything is about balance, even your hips. It’s yin and yang. My advice is to start stretching regularly and then experiment with different stretching techniques to see what suits you the best. You’ll feel better during lifts and your hips will thank you for it.
Read More: Glute Bridge
Leave a Reply